PL/SQL Data Types

Introduction to PL/SQL data types

Each value in PL/SQL such as a constant, variable and parameter has a data type that determines the storage format, valid values, and allowed operations.

PL/SQL has two kinds of data types: scalar and composite. The scalar types are types that store single values such as number, Boolean, character, and datetime whereas the composite types are types that store multiple values, for example, record and collection.

This tutorial explains the scalar data types that store values with no internal components.

PL/SQL divides the scalar data types into four families:

  • Number
  • Boolean
  • Character
  • Datetime

A scalar data type may have subtypes. A subtype is a data type that is a subset of another data type, which is its base type. A subtype further defines a base type by restricting the value or size of the base data type.

Note that PL/SQL scalar data types include SQL data types and their own data types such as Boolean.

Numeric data types

The numeric data types represent real numbers, integers, and floating-point numbers. They are stored as NUMBER, IEEE floating-point storage types (BINARY_FLOAT and BINARY_DOUBLE), and PLS_INTEGER.

The data types NUMBERBINARY_FLOAT, and BINARY_DOUBLE are SQL data types.

The PLS_INTEGER datatype is specific to PL/SQL. It represents signed 32 bits integers that range from -2,147,483,648 to 2,147,483,647.

Because PLS_INTEGER datatype uses hardware arithmetic, they are faster than NUMBER operations, which uses software arithmetic.

In addition, PLS_INTEGER values require less storage than NUMBER. Hence, you should always use PLS_INTEGER values for all calculations in its range to increase the efficiency of programs.

The PLS_INTEGER datatype has the following predefined subtypes:

PLS_INTEGER subtypesDescription
 NATURALRepresents nonnegative PLS_INTEGER values
 NATURALNRepresents nonnegative PLS_INTEGER values with NOT NULL constraint
 POSITIVERepresents positive PLS_INTEGER values
 POSITIVENRepresents positive PLS_INTEGER value with NOT NULL constraint
 SIGNTYPERepresents three values -1, 0, or 1, which are useful for tri-state logic programming
 SIMPLE_INTEGERRepresents PLS_INTEGER values with NOT NULL constraint.

Note that PLS_INTEGER and BINARY_INTEGER data types are identical.

Boolean data type

The BOOLEAN datatype has three data values: TRUE, FALSE, and NULL. Boolean values are typically used in control flow structures such as IF-THEN, CASE, and loop statements like LOOP, FOR LOOP, and WHILE LOOP.

SQL does not have the BOOLEAN data type, therefore, you cannot:

  • Assign a BOOLEAN value to a table column.
  • Select the value from a table column into a BOOLEAN variable.
  • Use a BOOLEAN value in an SQL function.
  • Use a BOOLEAN expression in an SQL statement.
  • Use a BOOLEAN value in the DBMS_OUTPUT.PUTLINE DBMS_OUTPUT.PUT subprograms.

Character data types

The character data types represent alphanumeric text. PL/SQL uses the SQL character data types such as CHARVARCHAR2LONGRAWLONG RAWROWID, and UROWID.

  •  CHAR(n) is a fixed-length character type whose length is from 1 to 32,767 bytes.
  •  VARCHAR2(n) is varying length character data from 1 to 32,767 bytes.

Datetime data types

The datetime data types represent dates, timestamps with or without time zones, and intervals. PL/SQL datetime data types are TIMESTAMP WITH LOCAL TIME ZONEINTERVAL YEAR TO MONTH, and INTERVAL DAY TO SECOND.

Data type synonyms

Data types have synonyms for compatibility with non-Oracle data sources such as IBM Db2, and SQL Server. It is not a good practice to use data type synonyms unless you are accessing a non-Oracle Database.

Data TypeSynonyms
NUMBERDEC, DECIMAL, DOUBLE PRECISION, FLOAT, INTEGER, INT, NUMERIC, REAL, SMALLINT
CHARCHARACTER, STRING
VARCHAR2VARCHAR

Now, you should have a complete overview of PL/SQL data types for manipulating data in the PL/SQL program.

PL/SQL Anonymous Block

PL/SQL anonymous block overview

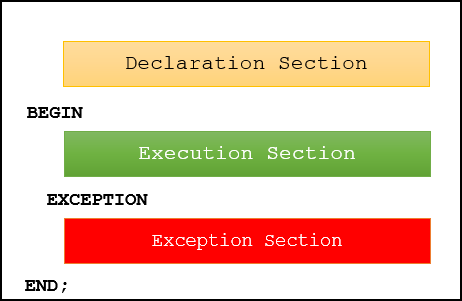
PL/SQL is a block-structured language whose code is organized into blocks. A block consists of three sections:

  1. Declaration
  2. Executable
  3. Exception-handling

In a block, the executable section is mandatory while the declaration and exception-handling sections are optional.

A PL/SQL block has a name. Functions or Procedures is an example of a named block. A named block is stored in the Oracle Database server and can be reusable later.

A block without a name is an anonymous block. An anonymous block is not saved in the Oracle Database server, so it is just for one-time use. However, PL/SQL anonymous blocks can be useful for testing purposes.

The following picture illustrates the structure of a PL/SQL block:

PL/SQL anonymous block

1) Declaration section

A PL/SQL block has a declaration section where you declare variables, allocate memory for cursors, and define data types.

2) Executable section

A PL/SQL block has an executable section. An executable section starts with the keyword BEGIN and ends with the keyword END. The executable section must have a least one executable statement, even if it is a NULL statement that does nothing.

3) Exception-handling section

A PL/SQL block has an exception-handling section that starts with the keyword EXCEPTION. The exception-handling section is where you catch and handle exceptions raised by the code in the execution section.

Note a block itself is an executable statement, therefore you can nest a block within other blocks.

PL/SQL anonymous block example

The following example shows a simple PL/SQL anonymous block with one executable section.

BEGIN
   DBMS_OUTPUT.put_line ('Hello World!');
END;Code language: PostgreSQL SQL dialect and PL/pgSQL (pgsql)

The executable section calls the DMBS_OUTPUT.PUT_LINE procedure to display the "Hello World" message on the screen.

Execute a PL/SQL anonymous block using SQL*Plus

Once you have the code of an anonymous block, you can execute it using SQL*Plus, which is a command-line interface for executing SQL statements and PL/SQL blocks provided by Oracle Database.

The following picture illustrates how to execute a PL/SQL block using SQL*Plus:

PL/SQL anonymous block example

First, connect to the Oracle Database server using a username and password.

Second, turn on the server output using the SET SERVEROUTPUT ON command so that the DBMS_OUTPUT.PUT_LINE procedure will display text on the screen.

Third, type the code of the block and enter a forward slash ( /) to instruct SQL*Plus to execute the block. Once you type the forward slash (/), SQL*Plus will execute the block and display the Hello World message on the screen as shown in the illustrations.

Note that you must execute SET SERVEROUTPUT ON command in every session that you connect to the Oracle Database in order to show the message using the DBMS_OUTPUT.PUT_LINE procedure.

To execute the block that you have entered again, you use / command instead of typing everything from scratch:

plsql anonymous block - execute a block again

If you want to edit the code block, use the edit command. SQL*Plus will write the code block to a file and open it in a text editor as shown in the following picture:

plsql anonymous block - edit

You can change the contents of the file like the following:

begin
	dbms_output.put_line('Hello There');
end;
/Code language: PostgreSQL SQL dialect and PL/pgSQL (pgsql)

Save and close the file. The contents of the file will be written to the buffer and recompiled.

After that, you can execute the code block again, it will use the new code:

plsql anonymous block - execute

Execute a PL/SQL anonymous block using SQL Developer

First, connect to the Oracle Database server using Oracle SQL Developer.

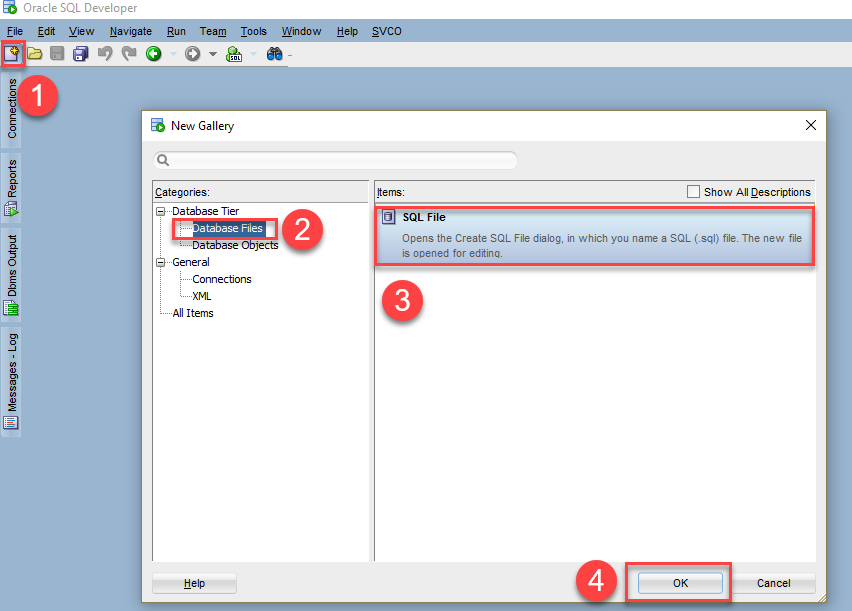
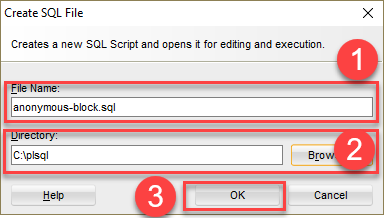
Second, create a new SQL file named anonymous-block.sql resided in the C:\plsql directory that will store the PL/SQL code.

PL/SQL anonymous block - sql developer
PL/SQL anonymous block - sql developer - create SQL file

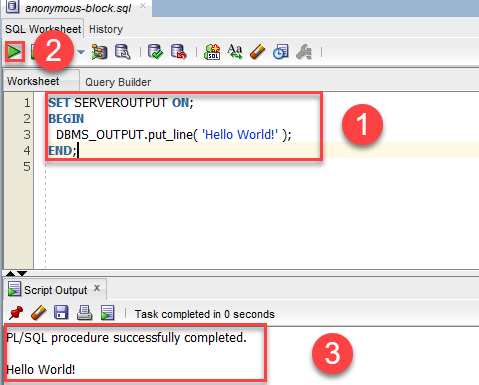
Third, enter the PL/SQL code and execute it by clicking the Execute button or pressing the Ctrl-Enter keyboard shortcut.

PL/SQL anonymous block - SQL developer - execute PL/SQL Block

More PL/SQL anonymous block examples

In this example, we first declare a variable l_message that holds the greeting message. And then, in the execution section, we use the DBMS_OUTPUT.PUTLINE procedure to show the content of this variable instead of using a literal string.

DECLARE
  l_message VARCHAR2( 255 ) := 'Hello World!';
BEGIN
  DBMS_OUTPUT.PUT_LINE( l_message );
END;Code language: PostgreSQL SQL dialect and PL/pgSQL (pgsql)

Here is the output:

Hello World!

The next anonymous block example adds an exception-handling section that catches ZERO_DIVIDE exception raised in the executable section and displays an error message.

DECLARE
      v_result NUMBER;
BEGIN
   v_result := 1 / 0;
   EXCEPTION
      WHEN ZERO_DIVIDE THEN
         DBMS_OUTPUT.PUT_LINE( SQLERRM );
END;Code language: PostgreSQL SQL dialect and PL/pgSQL (pgsql)

The error message is:

ORA-01476: divisor is equal to zero

Terraform fundamentals

Terraform terminologies.

Let’s start Terraform, and understand some key terminologies and concepts. Here are some fundamental terms and explanations.

  1. Provider: A provider is a plugin for Terraform that defines and manages resources for a specific cloud or infrastructure platform. Examples of providers include AWS, Azure, Google Cloud, and many others. You configure providers in your Terraform code to interact with the desired infrastructure platform.
  2. Resource: A resource is a specific infrastructure component that you want to create and manage using Terraform. Resources can include virtual machines, databases, storage buckets, network components, and more. Each resource has a type and configuration parameters that you define in your Terraform code.
  3. Module: A module is a reusable and encapsulated unit of Terraform code. Modules allow you to package infrastructure configurations, making it easier to maintain, share, and reuse them across different parts of your infrastructure. Modules can be your own creations or come from the Terraform Registry, which hosts community-contributed modules.
  4. Configuration File: Terraform uses configuration files (often with a .tf extension) to define the desired infrastructure state. These files specify providers, resources, variables, and other settings. The primary configuration file is usually named main.tf, but you can use multiple configuration files as well.
  5. Variable: Variables in Terraform are placeholders for values that can be passed into your configurations. They make your code more flexible and reusable by allowing you to define values outside of your code and pass them in when you apply the Terraform configuration.
  6. Output: Outputs are values generated by Terraform after the infrastructure has been created or updated. Outputs are typically used to display information or provide values to other parts of your infrastructure stack.
  7. State File: Terraform maintains a state file (often named terraform.tfstate) that keeps track of the current state of your infrastructure. This file is crucial for Terraform to understand what resources have been created and what changes need to be made during updates.
  8. Plan: A Terraform plan is a preview of changes that Terraform will make to your infrastructure. When you run terraform plan, Terraform analyzes your configuration and current state, then generates a plan detailing what actions it will take during the apply step.
  9. Apply: The terraform apply command is used to execute the changes specified in the plan. It creates, updates, or destroys resources based on the Terraform configuration.
  10. Workspace: Workspaces in Terraform are a way to manage multiple environments (e.g., development, staging, production) with separate configurations and state files. Workspaces help keep infrastructure configurations isolated and organized.
  11. Remote Backend: A remote backend is a storage location for your Terraform state files that is not stored locally. Popular choices for remote backends include Amazon S3, Azure Blob Storage, or HashiCorp Terraform Cloud. Remote backends enhance collaboration and provide better security and reliability for your state files.

These are some of the essential terms you’ll encounter when working with Terraform. As you start using Terraform for your infrastructure provisioning and management, you’ll become more familiar with these concepts and how they fit together in your IaC workflows.

Why Terraform ?

There are multiple reasons why Terraform is used over the other IaC tools but below are the main reasons.

  1. Multi-Cloud Support: Terraform is known for its multi-cloud support. It allows you to define infrastructure in a cloud-agnostic way, meaning you can use the same configuration code to provision resources on various cloud providers (AWS, Azure, Google Cloud, etc.) and even on-premises infrastructure. This flexibility can be beneficial if your organization uses multiple cloud providers or plans to migrate between them.
  2. Large Ecosystem: Terraform has a vast ecosystem of providers and modules contributed by both HashiCorp (the company behind Terraform) and the community. This means you can find pre-built modules and configurations for a wide range of services and infrastructure components, saving you time and effort in writing custom configurations.
  3. Declarative Syntax: Terraform uses a declarative syntax, allowing you to specify the desired end-state of your infrastructure. This makes it easier to understand and maintain your code compared to imperative scripting languages.
  4. State Management: Terraform maintains a state file that tracks the current state of your infrastructure. This state file helps Terraform understand the differences between the desired and actual states of your infrastructure, enabling it to make informed decisions when you apply changes.
  5. Plan and Apply: Terraform’s “plan” and “apply” workflow allows you to preview changes before applying them. This helps prevent unexpected modifications to your infrastructure and provides an opportunity to review and approve changes before they are implemented.
  6. Community Support: Terraform has a large and active user community, which means you can find answers to common questions, troubleshooting tips, and a wealth of documentation and tutorials online.
  7. Integration with Other Tools: Terraform can be integrated with other DevOps and automation tools, such as Docker, Kubernetes, Ansible, and Jenkins, allowing you to create comprehensive automation pipelines.
  8. HCL Language: Terraform uses HashiCorp Configuration Language (HCL), which is designed specifically for defining infrastructure. It’s human-readable and expressive, making it easier for both developers and operators to work with.

Terraform workspace, locals and variables.

Using workspace you can provision more than one environments. To do this using workspaces, you first create a workspace called dev using the terraform workspace new command:

$ terraform workspace new prod

terraform workspace new prod

terraform apply

… output trimmed..

As you can see new workspace ‘prod’ is created and new infrastructure is provisioned.

Note: * prod (* is showing current workspace).

terraform workspace select default

Now there are 6 instances up and running…

Question: How to change the server names and tags in PROD?

All commands will be applicable to current worspace.

After destroying prod, still you will be there. If you want to work in another env, change to it.

Terraform count and for_each

count

The count parameter in Terraform allows you to create a specified number of identical resources. It is an integral part of a resource block that defines how many instances of a particular resource should be created.

Pros:

  • Simple to use: The count parameter is straightforward for creating multiple instances of a resource.
  • Suitable for homogeneous resources: When all the resources you’re creating are identical except for an identifier, count is likely a good fit.

Cons:

  • Lacks key-based identification: count doesn’t include a way to address a resource with a unique key directly; you have to rely on an index.
  • Immutable: If you remove an item from the middle of the count list, Terraform marks all subsequent resources for recreation which can be disruptive in certain scenarios.

count = 3 is added.

One EC2 had already been created, therefore it added 2 more. This feature is called… ” “.

Screenshot from aws console.

for_each

The for_each loop in Terraform, used within the for_each argument, iterates over a map or a set of strings, allowing you to create resources that correspond to the given elements.

Pros:

  • Detailed declaration: for_each provides greater control when creating resources that require specific attributes or configurations.
  • Key-based identification: Resources created with for_each can be directly identified and accessed by their keys, making modifications more manageable.
  • Non-destructive updates: If you remove an item from the map or set, only that specific resource will be affected.

Cons:

  • Complexity: for_each is more complex to use than count and requires more planning.
  • Requires a set or map: You must provide a set or map of items to iterate over, which might not be necessary or straightforward for all situations.

When to Use Count vs. For_each

Both constructs are powerful, but they shine in different situations. Here’s a quick reference to determine which to use:

Use Count when:

  • You need to create a fixed number of similar resources.
  • Resource differences can be represented by an index.

Use For_each when:

  • You’re dealing with a collection of items that have unique identifiers.
  • Your resources are not perfectly identical and require individual configurations.
  • You plan to make future modifications that should not affect all resources.

Terrafom installation creating EC2

Terraform script (main.tf) to create the vpc in aws.

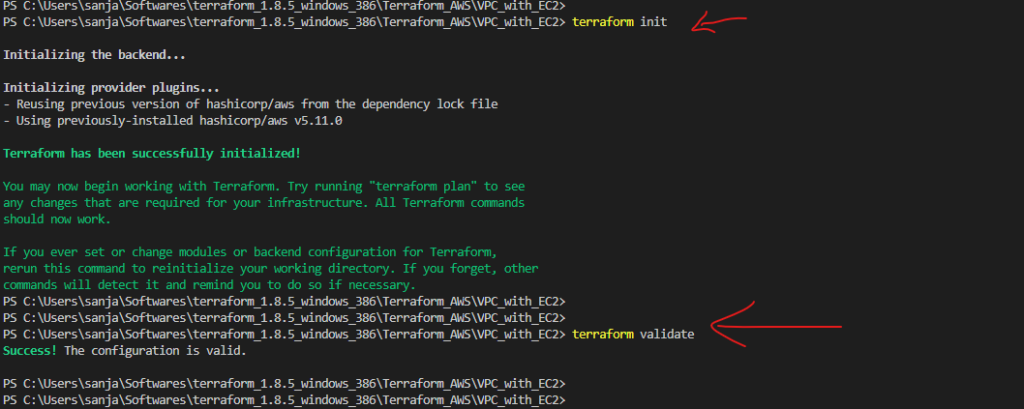
  1. terraform init
  2. terraform validate
  3. terraform plan -out sanjayShonak_vpc
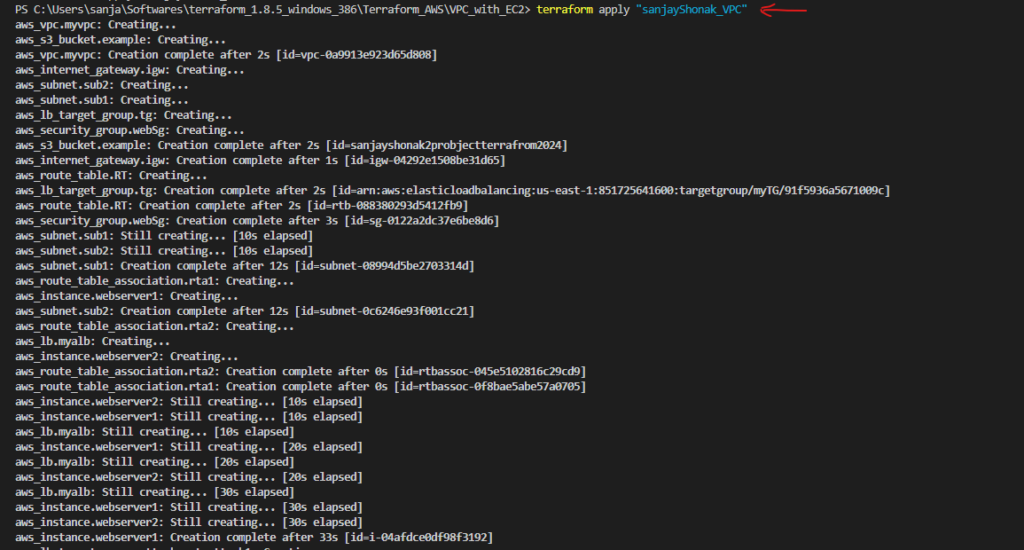
  4. terraform apply “sanjayShonak_VPC”

terraform plan -out sanjayShonak_vpc

… output trimmed…

Note: it’s best practice to provide output file. In that case you can use the command provided at the end.

terraform apply “sanjayShonak_VPC”

… output trimmed. As you can see it has added 16 resources.

terraform state

This does advanced state management. The state is stored by default in a local file named “terraform.tfstate”, but it can also be stored remotely, which works better in a team environment.

OptionDescription
listList resources in the state.
showShow a resource in the state.
mvMove an item in the state.
rmRemove instances from the state.
pullPull current state and output to stdout.

terraform state list

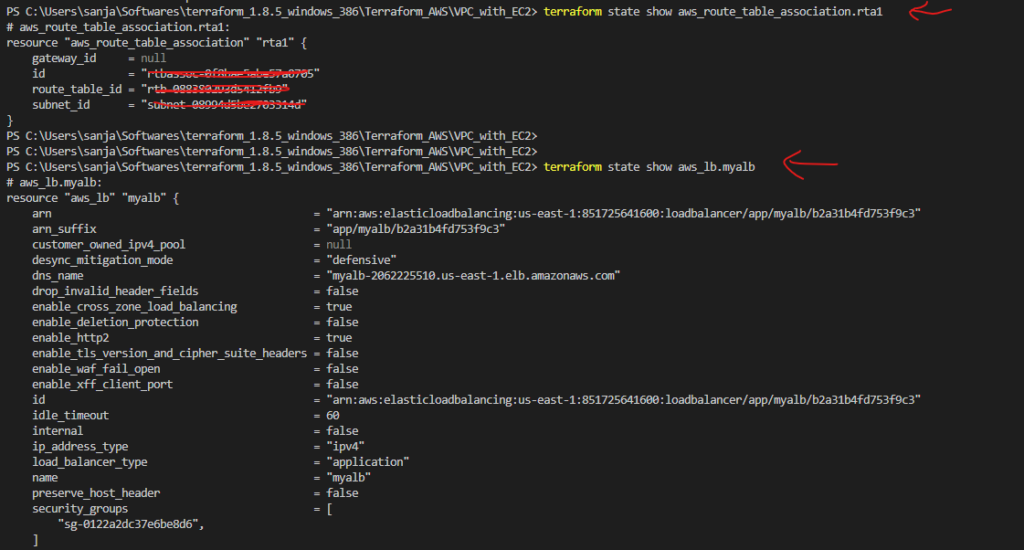
terraform state show aws_route_table_association.rta1

terraform state show aws_lb.myalb

… output trimmed.

terraform graph

Produces a representation of the dependency graph between different objects in the current configuration and state. The graph is presented in the DOT language. The typical program that can read this format is GraphViz, but many web services are also available to read this format.

terraform graph

terraform destroy

GIT installation and account setup

How to install git

If you’re on Fedora (or any closely-related RPM-based distribution, such as RHEL or CentOS), you can use dnf:

$ sudo dnf install git-all

If you’re on a Debian-based distribution, such as Ubuntu, try apt:

sudo apt install git-all
Note: Output screenshot is trimmed...

… At the end you can check if git is installed properly.

You can install in window using from winget.

winget install –id Git.Git -e –source winget

Note: It was already installed in my case,

git init

git init will created below directories.

Add config and email.

PS C:\Users\sanja\Softwares\git> git config –global user.name “SanjayShonak”
PS C:\Users\sanja\Softwares\git> git config –global user.email “sanjay.shonak@gmail.com”

check if user and email are configured correctly.

git config –list

You can clone your directory from github. You will be asked for user and pwd.

git clone https://github.com/SanjayShonak/Terraform

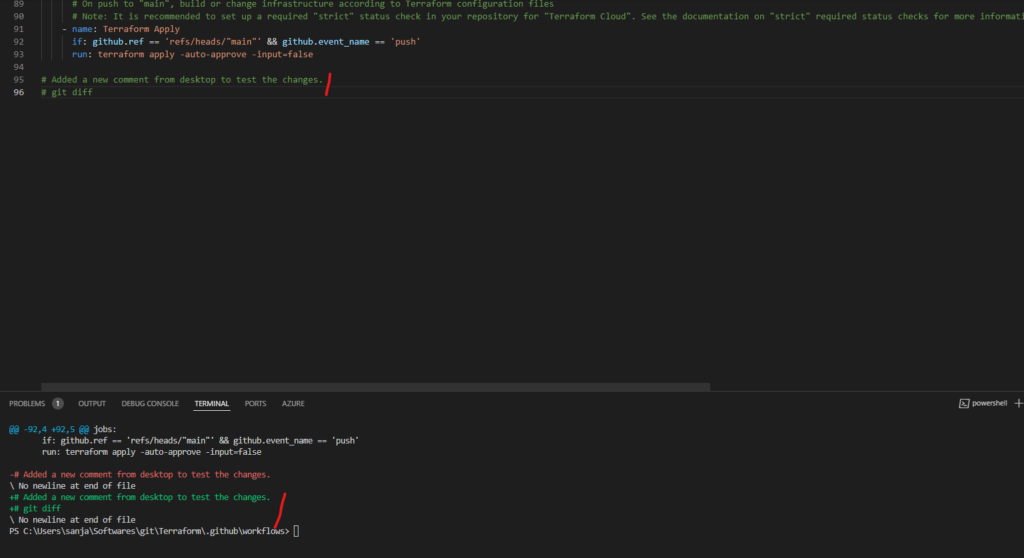
In order to see the difference, git work like linux.

git diff

GIT documents

35 uses of Linux Find Command

Part I – Basic Find Commands for Finding Files with Names

When it comes to finding files with specific names, the find command offers a range of options to streamline the process. Here are some basic find commands for locating files based on their names.

1. Find Files Using Name in Current Directory

Find all the files whose name is tecmint.txt in a current working directory.

# find . -name tecmint.txt

./tecmint.txt

2. Find Files Under Home Directory

Find all the files under /home directory with the name tecmint.txt.

# find /home -name tecmint.txt

/home/tecmint.txt

3. Find Files Using Name and Ignoring Case

Find all the files whose name is tecmint.txt and contains both capital and small letters in /home directory.

# find /home -iname tecmint.txt

./tecmint.txt
./Tecmint.txt

4. Find Directories Using Name

Find all directories whose name is Tecmint in / directory.

# find / -type d -name Tecmint

/Tecmint

5. Find PHP Files Using Name

Find all php files whose name is tecmint.php in a current working directory.

# find . -type f -name tecmint.php

./tecmint.php

6. Find all PHP Files in the Directory

Find all php files in a directory.

# find . -type f -name "*.php"

./tecmint.php
./login.php
./index.php

Part II – Find Files Based on their Permissions

Here are some examples of find commands for finding files based on their permissions.

7. Find Files With 777 Permissions

Find all the files whose permissions are 777.

# find . -type f -perm 0777 -print

8. Find Files Without 777 Permissions

Find all the files without permission 777.

# find / -type f ! -perm 777

9. Find SGID Files with 644 Permissions

Find all the SGID bit files whose permissions are set to 644.

# find / -perm 2644

10. Find Sticky Bit Files with 551 Permissions

Find all the Sticky Bit set files whose permission is 551.

# find / -perm 1551

11. Find SUID Files

Find all SUID set files.

# find / -perm /u=s

12. Find SGID Files

Find all SGID set files.

# find / -perm /g=s

13. Find Read-Only Files

Find all Read-Only files.

# find / -perm /u=r

14. Find Executable Files

Find all Executable files.

# find / -perm /a=x

15. Find Files with 777 Permissions and Chmod to 644

Find all 777 permission files and use the chmod command to set permissions to 644.

# find / -type f -perm 0777 -print -exec chmod 644 {} \;

16. Find Directories with 777 Permissions and Chmod to 755

Find all 777 permission directories and use the chmod command to set permissions to 755.

# find / -type d -perm 777 -print -exec chmod 755 {} \;

17. Find and Remove Single File

To find a single file called tecmint.txt and remove it.

# find . -type f -name "tecmint.txt" -exec rm -f {} \;

18. Find and remove Multiple File

To find and remove multiple files such as .mp3 or .txt, then use.

# find . -type f -name "*.txt" -exec rm -f {} \;

OR

# find . -type f -name "*.mp3" -exec rm -f {} \;

19. Find all Empty Files

To find all empty files under a certain path.

# find /tmp -type f -empty

20. Find all Empty Directories

To file all empty directories under a certain path.

# find /tmp -type d -empty

21. File all Hidden Files

To find all hidden files, use the below command.

# find /tmp -type f -name ".*"

Part III – Search Files Based On Owners and Groups

Here are some examples of find commands for finding files based on owners and groups:

22. Find Single File Based on User

To find all or single files called tecmint.txt under / root directory of owner root.

# find / -user root -name tecmint.txt

23. Find all Files Based on User

To find all files that belong to user Tecmint under /home directory.

# find /home -user tecmint

24. Find all Files Based on Group

To find all files that belong to the group Developer under /home directory.

# find /home -group developer

25. Find Particular Files of User

To find all .txt files of user Tecmint under /home directory.

# find /home -user tecmint -iname "*.txt"

Part IV – Find Files and Directories Based on Date and Time

Here are some examples of find commands for locating files and directories based on date and time.

26. Find Last 50 Days Modified Files

To find all the files which are modified 50 days back.

# find / -mtime 50

27. Find Last 50 Days Accessed Files

To find all the files which are accessed 50 days back.

# find / -atime 50

28. Find Last 50-100 Days Modified Files

To find all the files which are modified more than 50 days back and less than 100 days.

# find / -mtime +50 –mtime -100

29. Find Changed Files in Last 1 Hour

To find all the files which are changed in the last 1 hour.

# find / -cmin -60

30. Find Modified Files in Last 1 Hour

To find all the files which are modified in the last 1 hour.

# find / -mmin -60

31. Find Accessed Files in Last 1 Hour

To find all the files which are accessed in the last 1 hour.

# find / -amin -60

Part V – Find Files and Directories Based on Size

Here are some examples of find commands for locating files and directories based on size.

32. Find 50MB Files

To find all 50MB files, use.

# find / -size 50M

33. Find Size between 50MB – 100MB

To find all the files which are greater than 50MB and less than 100MB.

# find / -size +50M -size -100M

34. Find and Delete 100MB Files

To find all 100MB files and delete them using one single command.

# find / -type f -size +100M -exec rm -f {} \;

35. Find Specific Files and Delete

Find all .mp3 files with more than 10MB and delete them using one single command.

# find / -type f -name *.mp3 -size +10M -exec rm {} \;

Linux command

Tips and tricks for curl and wget

Flex your command line muscles with these tricks for using curl and wget to interact with remote systems.

The unix commands curl and wget are useful for accessing URLs without resorting to a browser. Both commands allow you to transfer data from a network server, with curl being the more robust of the two. You could use either of them to automate downloads from various servers.

  1. The curl command

The curl command allows you to transfer data from a network server, but it also enables you to move data to a network server. In addition to HTTP, you can use other protocols, including HTTPS, FTP, POP3, SMTP, and Telnet. Administrators commonly rely on curl to interact with APIs using the DELETE, GET, POST, and PUT methods.

The syntax for curl is fairly straight-forward at first glance. Here is an example:

$ curl http://url/help.txt

curl Options

You can supply various options to your command syntax:

curl [options] [url]

It is the options which make curl so robust. The following are some of the available options used with curl and examples of their use.

-a, –append

When uploading a file, this option allows you to append to the target file instead of overwriting it (FTP, SFTP).

$ curl --append file.txt ftp://ftp.example.com/file.txt

–connect-timeout

The --connect-timeout option sets the maximum time in seconds that curl can use to make its connection to the remote server. This option is handy to prevent the connection from terminating too quickly, and to minimize the amount of time you want the command to attempt the connection.

$ curl --connect-timeout 600 http://www.example.com/

–dns-servers

This option allows you to list DNS servers curl should use instead of the system default. This list can be handy when troubleshooting DNS issues or if you need to resolve an address against a specific nameserver.

$ curl --dns-servers 8.8.8.8 http://www.example.com/

–http3

You can specifically tell curl to use the http3 protocol to connect to the host and port provided with a https URL. –http2 and –http1.1 function in the same way and can be used to verify a webserver.

$ curl --http3 http://www.example.com:8080/

–output

If you need to retrieve a file from a remote server via a URL, --output is an easy way to save the file locally.

$ curl http://www.example.com/help.txt --output file.txt

–progress-bar

This option displays the progress of the file transfer when combined with the --output option.

$ curl --progress-bar http://www.example.com/help.txt --output file.txt

–sslv2

Like with HTTP, you can specifically tell curl to use a specific SSL option for the command to connect to and in this case we are specifying version 2. –ssl specifies SSL needs to be used and –sslv3 specifies SSL version 3. Note: sslv2 and sslv3 are considered legacy by the maintainer though still available.

$ curl --sslv2 https://www.example.com/

–verbose

The --verbose option with curl is useful for debugging and displaying what is going on during the call to the URL.

$ curl --verbose http://www.example.com

2. The wget command

Unlike curl, the wget command is solely for the retrieval of information from a remote server. By default, the information received is saved with the same name as in the provided URL.

Here is an example of the basic wget syntax:

$ wget http://www.example.com/help.txt

wget Options

Like curl, you can supply various options to your wget command syntax:

wget [option] [url]

–dns-servers=ADDRESSES

You can specify one or more specific DNS servers to use when utilizing wget to access a remote server. The syntax differs, however, if the option and nameserver addresses are joined with an =.

$ wget --dns-servers=8.8.8.8 http://www.example.com

-O

To save a file with a new name when using wget, utilize the --output-document option, or more simply -O.

$ wget http://www.example.com/help.txt -O file.txt

–progress=type

With wget, you can supply a type (dot or bar) to determine the ASCII visual of the progress bar. If a type is not specified, it will default to dot.

$ wget --progress=dot http://www.example.com

Wrap up

The curl and wget commands can be very useful when added to scripts to automatically download RPM packages or other files. This post only touches some of the most common features of what these commands can do. Check the related man pages for a complete list of options available for both curl and wget.

AWS: CLI, CloudShell and CloudFormation

aws CLI

To install aws CLI you can simply download and install it. Alternatively you can simply run command < msiexec.exe /i https://awscli.amazonaws.com/AWSCLIV2.msi > or command

<msiexec.exe /i https://awscli.amazonaws.com/AWSCLIV2.msi /qn > for silent installation in windows.

Note: Make sure you are installing the latest version aws CLI.

How to setup aws CLI

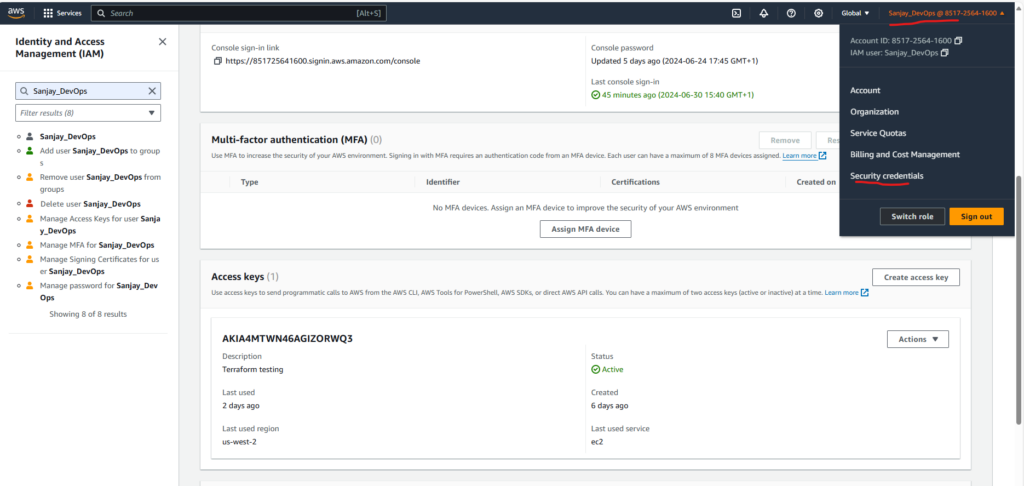
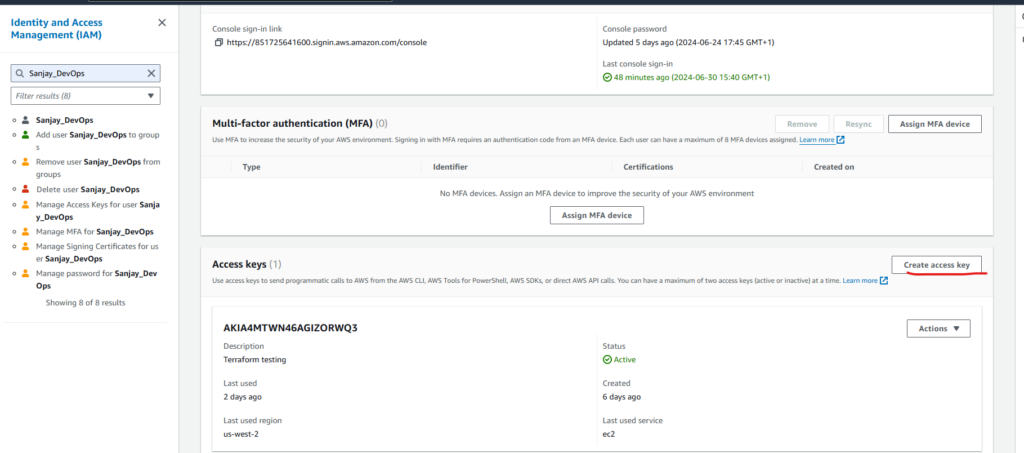
  1. Select the ‘Security Credentials’ from the drop down button under your account.

2. Generate access key.

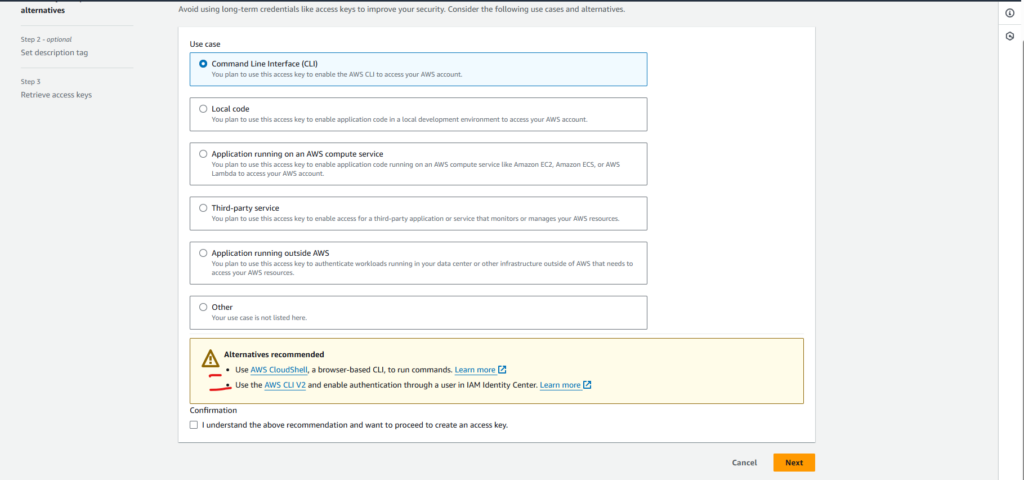
Note: You can use either aws CloudShell (browser based) or aws CLI machine/laptop/computer based.

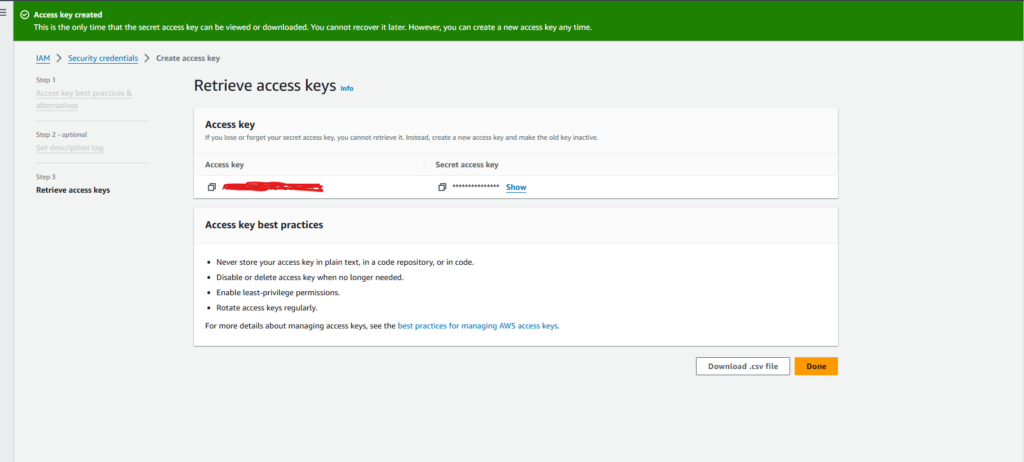
Accept and click next. Now you can download your keys.

Setup your aws CLI account.

AWS CLI doucumnets.

AWS CLI Command Reference — AWS CLI 1.33.18 Command Reference (amazon.com)

aws cli is full of features and you can take help.

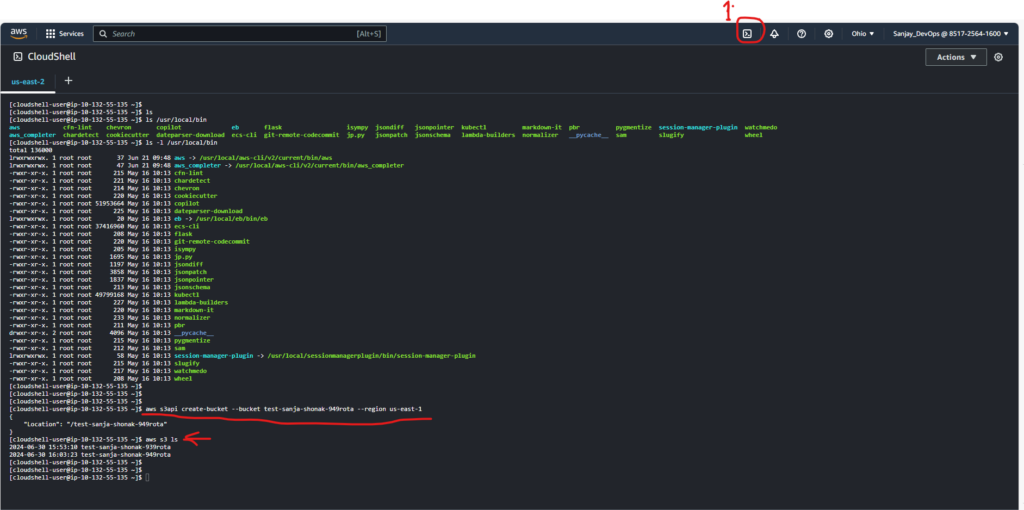
Create s3 bucket “test-sanja-shonak-939rota” in “us-east-1” region.

You can see it

aws CloudShell

In order to use the CloudShel just click the ‘shell’ icon and it will launch a linux terminal.

Note: In CloudShell you don’t need to configure the keys.

ls -l /usr/local/bin

Documents about CloudShell. AWS CloudShell Documentation (amazon.com)

Deleting s3 buckets created during this test.

aws CloudFormation

aws CloudFormation introduction from aws.

  1. Code your infrastructure using the CloudFormation template language in the YAML or JSON format, or start from many available sample templates.
  2. Use AWS CloudFormation via the browser console, command line tools, or APIs to create a stack based on your template code.
  3. AWS CloudFormation provisions and configures the stacks and resources you specified in your template.

Benefits and features

IaC generator

Assist developers in deploying their applications by generating CloudFormation templates for AWS and third-party resources provisioned in AWS.

Stacks

A stack is a collection of AWS resources that you can manage as a single unit. All the resources in a stack are defined by the stack’s AWS CloudFormation template

Application Composer– new

Application Composer helps you visually design and edit your stacks with simple drag-and-drop editor, built-in Step Functions Workflow Studio, and drag-and-drop integrations between services.Learn more 

Build your template

Change sets

Change sets allow you to preview how proposed changes to a stack might impact your running resources, making changes to your stack only when you decide

Learn more 

Template linting and policy-as-code

Check resource properties and values you describe in your templates against the AWS CloudFormation resource specification . Validate your templates for policy compliance against rules you create.

Learn more on cfn-lint  and cfn-guard .

StackSets

StackSets enables you to create, update, or delete stacks across multiple accounts and regions with a single operation.

CloudFormation Public Registry

Discover, provision, and manage third-party resource types and modules published by AWS Partner Network (APN) Partners and the developer community. Registry: Public extensions