PL/SQL FOR LOOP

Introduction to PL/SQL FOR LOOP statement

PL/SQL FOR LOOP executes a sequence of statements a specified number of times. The PL/SQL FOR LOOP statement has the following structure:

FOR index IN lower_bound .. upper_bound
LOOP 
    statements; 
END LOOP;Code language: SQL (Structured Query Language) (sql)

The index is an implicit variable. It is local to the FOR LOOP statement. In other words, you cannot reference it outside the loop.

Inside the loop, you can reference index but you cannot change its value. After the FOR LOOP statement executes, the index becomes undefined.

Both lower_bound and upper_bound are numbers or expressions that evaluate numbers. The lower_bound and upper_bound are evaluated once when the FOR LOOP statement starts. Their values are stored as temporary PLS_INTEGER values. The results of lower_bound and upper_bound are rounded to the nearest integer if necessary.

If you modify the values of lower_bound or upper_bound inside the loop, the change will have no effect because they are evaluated once only before the first loop iteration starts.

Typically, lower_bound is less than upper_bound. In this case, index is set to lower_bound, the statements execute, and control returns to the top of the loop, where index is compared to upper_bound. If index is less than upper_boundindex is incremented by one, the statements execute, and control again returns to the top of the loop. When index is greater than upper_bound, the loop terminates, and control transfers to the statement after the FOR LOOP statement.

If lower_bound is equal to upper_bound, the statements execute only once. When lower_bound is greater than upper_bound, the statements do not execute at all.

PL/SQL FOR LOOP examples

Let’s take some examples of using the FOR LOOP statement to understand how it works.

A) Simple PL/SQL FOR LOOP example

In this example, the loop index is l_counterlower_bound is one, and upper_bound is five. The loop shows a list of integers from 1 to 5.

BEGIN
  FOR l_counter IN 1..5
  LOOP
    DBMS_OUTPUT.PUT_LINE( l_counter );
  END LOOP;
END;
Code language: SQL (Structured Query Language) (sql)

Here is the result:

1
2
3
4
5
Code language: SQL (Structured Query Language) (sql)

B) Simulating STEP clause in FOR LOOP statement

The loop index is increased by one after each loop iteration and you cannot change the increment e.g., two, three, and four. However, you can use an additional variable to simulate the increment by two, three, four, etc., as shown in the example below:

DECLARE
  l_step  PLS_INTEGER := 2;
BEGIN
  FOR l_counter IN 1..5 LOOP
    dbms_output.put_line (l_counter*l_step);
  END LOOP;
END;Code language: SQL (Structured Query Language) (sql)

Result:

2
4
6
8
10
Code language: SQL (Structured Query Language) (sql)

The result shows that, after each loop iteration, the output number is incremented by two instead of one.

C) Referencing variable with the same name as the loop index

Consider the following example:

DECLARE
  l_counter PLS_INTEGER := 10;
BEGIN
  FOR l_counter IN 1.. 5 loop
    DBMS_OUTPUT.PUT_LINE (l_counter);
  end loop;
  -- after the loop
  DBMS_OUTPUT.PUT_LINE (l_counter);
END; 
Code language: SQL (Structured Query Language) (sql)

Here is the result:

1
2
3
4
5
10Code language: SQL (Structured Query Language) (sql)

In this example, we had a variable named l_counter, which is also the name of the index. The result shows that l_counter in the FOR loop hides the variable l_counter declared in the enclosing block.

To reference the variable l_counter inside the loop, you must qualify it using a block label as shown below:

<<outer>>
DECLARE
  l_counter PLS_INTEGER := 10;
BEGIN
  FOR l_counter IN 1.. 5 loop
    DBMS_OUTPUT.PUT_LINE ('Local counter:' ||  l_counter);
    outer.l_counter := l_counter;
  end loop;
  -- after the loop
  DBMS_OUTPUT.PUT_LINE ('Global counter' || l_counter);
END outer;
Code language: SQL (Structured Query Language) (sql)

D) Referencing loop index outside the FOR LOOP

The following example causes an error because it references the loop index, which is undefined, outside the FOR LOOP statement.

BEGIN
  FOR l_index IN 1..3 loop
    DBMS_OUTPUT.PUT_LINE (l_index);
  END LOOP;
  -- referencing index after the loop
  DBMS_OUTPUT.PUT_LINE (l_index);
END;
Code language: SQL (Structured Query Language) (sql)

Oracle issued the following error:

PLS-00201: identifier 'L_INDEX' must be declared
Code language: SQL (Structured Query Language) (sql)

FOR LOOP with REVERSE keyword

The following shows the structure of the FOR LOOP statement with REVERSE keyword:

FOR index IN REVERSE lower_bound .. upper_bound
    LOOP 
    statements; 
END LOOP;
Code language: SQL (Structured Query Language) (sql)

With the REVERSE keyword, the index is set to upper_bound and decreased by one in each loop iteration until it reaches lower_bound.

See the following example:

BEGIN
  FOR l_counter IN REVERSE 1..3
  LOOP
    DBMS_OUTPUT.PUT_LINE( l_counter );
  END LOOP;
END;
Code language: SQL (Structured Query Language) (sql)

Result:

3
2
1
Code language: SQL (Structured Query Language) (sql)

Without the REVERSE keyword, the output will be:

1
2
3
Code language: SQL (Structured Query Language) (sql)

In this tutorial, you have learned how to use the PL/SQL FOR LOOP statement to execute a sequence of statements a specified number of times.

PL/SQL LOOP

Introduction to PL/SQL LOOP statement

The PL/SQL LOOP statement is a control structure that repeatedly executes a block of code until a specific condition is met or until you manually exit the loop.

Here’s the syntax of the PL/SQL LOOP statement:

<<label>> LOOP
    statements;
END LOOP loop_label;Code language: SQL (Structured Query Language) (sql)

This structure is the most basic of all the loop constructs including FOR LOOP and WHILE LOOP. This basic LOOP statement consists of a LOOP keyword, a body of executable code, and the END LOOP keywords.

The LOOP statement executes the statements in its body and returns control to the top of the loop. Typically, the body of the loop contains at least one EXIT or EXIT WHEN statement for terminating the loop. Otherwise, the loop becomes an infinite loop.

The LOOP statement can have an optional label that appears at the beginning and the end of the statement.

It is a good practice to use the LOOP statement when:

  • You want to execute the loop body at least once.
  • You are not sure of the number of times you want the loop to execute.

EXIT statement

The EXIT statement allows you to unconditionally exit the current iteration of a loop.

LOOP
    EXIT;
END LOOP; 
Code language: SQL (Structured Query Language) (sql)

Typically, you use the EXIT statement with an IF statement to terminate a loop when a condition is true:

LOOP
    IF condition THEN
        EXIT;
    END IF;
END LOOP;
Code language: SQL (Structured Query Language) (sql)

The following example illustrates how to use the LOOP statement to execute a sequence of code and EXIT statement to terminate the loop.

DECLARE
  l_counter NUMBER := 0;
BEGIN
  LOOP
    l_counter := l_counter + 1;
    IF l_counter > 3 THEN
      EXIT;
    END IF;
    dbms_output.put_line( 'Inside loop: ' || l_counter )  ;
  END LOOP;
  -- control resumes here after EXIT
  dbms_output.put_line( 'After loop: ' || l_counter );
END;Code language: SQL (Structured Query Language) (sql)

Here is the output:

Inside loop: 1
Inside loop: 2
Inside loop: 3
After loop: 4
Code language: SQL (Structured Query Language) (sql)

The following explains the logic of the code:

  • First, declare and initialize a variable l_counter to zero.
  • Second, increase the l_counter by one inside the loop and exit the loop if the l_counter is greater than three. If the l_counter is less than or equal to three, show the l_counter value. Because the initial value of  l_counter is zero, the code in the body of the loop executes three times before it is terminated.
  • Third, display the value of the l_counter after the loop.

EXIT WHEN statement

The EXIT WHEN statement has the following syntax:

EXIT WHEN condition;Code language: SQL (Structured Query Language) (sql)

The EXIT WHEN statement exits the current iteration of a loop when the condition in the WHEN clause is TRUE. Essentially, the EXIT WHEN statement is a combination of an EXIT and an IF THEN statement.

Each time the control reaches the EXIT WHEN statement, the condition is evaluated. If the condition evaluates to TRUE, then the loop terminates. Otherwise, the EXIT WHEN clause does nothing. Inside the loop body, you must make the condition TRUE at some point to prevent an infinite loop.

The following example uses the EXIT WHEN statement to terminate a loop.

DECLARE
  l_counter NUMBER := 0;
BEGIN
  LOOP
    l_counter := l_counter + 1;
    EXIT WHEN l_counter > 3;
    dbms_output.put_line( 'Inside loop: ' || l_counter ) ;
  END LOOP;

  -- control resumes here after EXIT
  dbms_output.put_line( 'After loop: ' || l_counter );
END;Code language: SQL (Structured Query Language) (sql)

Notice that this example is logically equivalent to the example that uses the EXIT statement above.

Constructing nested loops using PL/SQL LOOP statements

It is possible to nest a LOOP statement within another LOOP statement as shown in the following example:

DECLARE
  l_i NUMBER := 0;
  l_j NUMBER := 0;
BEGIN
  <<outer_loop>>
  LOOP
    l_i := l_i + 1;
    EXIT outer_loop WHEN l_i > 2;    
    dbms_output.put_line('Outer counter ' || l_i);
    -- reset inner counter
    l_j := 0;
      <<inner_loop>> LOOP
      l_j := l_j + 1;
      EXIT inner_loop WHEN l_j > 3;
      dbms_output.put_line(' Inner counter ' || l_j);
    END LOOP inner_loop;
  END LOOP outer_loop;
END;Code language: SQL (Structured Query Language) (sql)

Here is the output:

Outer counter 1
 Inner counter 1
 Inner counter 2
 Inner counter 3
Outer counter 2
 Inner counter 1
 Inner counter 2
 Inner counter 3Code language: SQL (Structured Query Language) (sql)

In this tutorial, you have learned how to use the PL/SQL LOOP statement to repeatedly execute a block of code until a condition is met.

PL/SQL Data Types

Introduction to PL/SQL data types

Each value in PL/SQL such as a constant, variable and parameter has a data type that determines the storage format, valid values, and allowed operations.

PL/SQL has two kinds of data types: scalar and composite. The scalar types are types that store single values such as number, Boolean, character, and datetime whereas the composite types are types that store multiple values, for example, record and collection.

This tutorial explains the scalar data types that store values with no internal components.

PL/SQL divides the scalar data types into four families:

  • Number
  • Boolean
  • Character
  • Datetime

A scalar data type may have subtypes. A subtype is a data type that is a subset of another data type, which is its base type. A subtype further defines a base type by restricting the value or size of the base data type.

Note that PL/SQL scalar data types include SQL data types and their own data types such as Boolean.

Numeric data types

The numeric data types represent real numbers, integers, and floating-point numbers. They are stored as NUMBER, IEEE floating-point storage types (BINARY_FLOAT and BINARY_DOUBLE), and PLS_INTEGER.

The data types NUMBERBINARY_FLOAT, and BINARY_DOUBLE are SQL data types.

The PLS_INTEGER datatype is specific to PL/SQL. It represents signed 32 bits integers that range from -2,147,483,648 to 2,147,483,647.

Because PLS_INTEGER datatype uses hardware arithmetic, they are faster than NUMBER operations, which uses software arithmetic.

In addition, PLS_INTEGER values require less storage than NUMBER. Hence, you should always use PLS_INTEGER values for all calculations in its range to increase the efficiency of programs.

The PLS_INTEGER datatype has the following predefined subtypes:

PLS_INTEGER subtypesDescription
 NATURALRepresents nonnegative PLS_INTEGER values
 NATURALNRepresents nonnegative PLS_INTEGER values with NOT NULL constraint
 POSITIVERepresents positive PLS_INTEGER values
 POSITIVENRepresents positive PLS_INTEGER value with NOT NULL constraint
 SIGNTYPERepresents three values -1, 0, or 1, which are useful for tri-state logic programming
 SIMPLE_INTEGERRepresents PLS_INTEGER values with NOT NULL constraint.

Note that PLS_INTEGER and BINARY_INTEGER data types are identical.

Boolean data type

The BOOLEAN datatype has three data values: TRUE, FALSE, and NULL. Boolean values are typically used in control flow structures such as IF-THEN, CASE, and loop statements like LOOP, FOR LOOP, and WHILE LOOP.

SQL does not have the BOOLEAN data type, therefore, you cannot:

  • Assign a BOOLEAN value to a table column.
  • Select the value from a table column into a BOOLEAN variable.
  • Use a BOOLEAN value in an SQL function.
  • Use a BOOLEAN expression in an SQL statement.
  • Use a BOOLEAN value in the DBMS_OUTPUT.PUTLINE DBMS_OUTPUT.PUT subprograms.

Character data types

The character data types represent alphanumeric text. PL/SQL uses the SQL character data types such as CHARVARCHAR2LONGRAWLONG RAWROWID, and UROWID.

  •  CHAR(n) is a fixed-length character type whose length is from 1 to 32,767 bytes.
  •  VARCHAR2(n) is varying length character data from 1 to 32,767 bytes.

Datetime data types

The datetime data types represent dates, timestamps with or without time zones, and intervals. PL/SQL datetime data types are TIMESTAMP WITH LOCAL TIME ZONEINTERVAL YEAR TO MONTH, and INTERVAL DAY TO SECOND.

Data type synonyms

Data types have synonyms for compatibility with non-Oracle data sources such as IBM Db2, and SQL Server. It is not a good practice to use data type synonyms unless you are accessing a non-Oracle Database.

Data TypeSynonyms
NUMBERDEC, DECIMAL, DOUBLE PRECISION, FLOAT, INTEGER, INT, NUMERIC, REAL, SMALLINT
CHARCHARACTER, STRING
VARCHAR2VARCHAR

Now, you should have a complete overview of PL/SQL data types for manipulating data in the PL/SQL program.

PL/SQL Anonymous Block

PL/SQL anonymous block overview

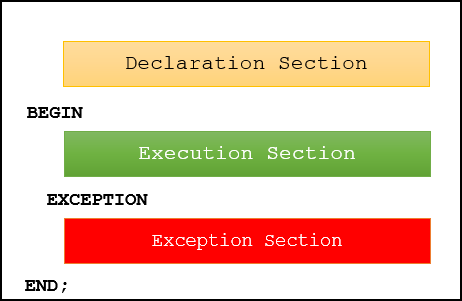
PL/SQL is a block-structured language whose code is organized into blocks. A block consists of three sections:

  1. Declaration
  2. Executable
  3. Exception-handling

In a block, the executable section is mandatory while the declaration and exception-handling sections are optional.

A PL/SQL block has a name. Functions or Procedures is an example of a named block. A named block is stored in the Oracle Database server and can be reusable later.

A block without a name is an anonymous block. An anonymous block is not saved in the Oracle Database server, so it is just for one-time use. However, PL/SQL anonymous blocks can be useful for testing purposes.

The following picture illustrates the structure of a PL/SQL block:

PL/SQL anonymous block

1) Declaration section

A PL/SQL block has a declaration section where you declare variables, allocate memory for cursors, and define data types.

2) Executable section

A PL/SQL block has an executable section. An executable section starts with the keyword BEGIN and ends with the keyword END. The executable section must have a least one executable statement, even if it is a NULL statement that does nothing.

3) Exception-handling section

A PL/SQL block has an exception-handling section that starts with the keyword EXCEPTION. The exception-handling section is where you catch and handle exceptions raised by the code in the execution section.

Note a block itself is an executable statement, therefore you can nest a block within other blocks.

PL/SQL anonymous block example

The following example shows a simple PL/SQL anonymous block with one executable section.

BEGIN
   DBMS_OUTPUT.put_line ('Hello World!');
END;Code language: PostgreSQL SQL dialect and PL/pgSQL (pgsql)

The executable section calls the DMBS_OUTPUT.PUT_LINE procedure to display the "Hello World" message on the screen.

Execute a PL/SQL anonymous block using SQL*Plus

Once you have the code of an anonymous block, you can execute it using SQL*Plus, which is a command-line interface for executing SQL statements and PL/SQL blocks provided by Oracle Database.

The following picture illustrates how to execute a PL/SQL block using SQL*Plus:

PL/SQL anonymous block example

First, connect to the Oracle Database server using a username and password.

Second, turn on the server output using the SET SERVEROUTPUT ON command so that the DBMS_OUTPUT.PUT_LINE procedure will display text on the screen.

Third, type the code of the block and enter a forward slash ( /) to instruct SQL*Plus to execute the block. Once you type the forward slash (/), SQL*Plus will execute the block and display the Hello World message on the screen as shown in the illustrations.

Note that you must execute SET SERVEROUTPUT ON command in every session that you connect to the Oracle Database in order to show the message using the DBMS_OUTPUT.PUT_LINE procedure.

To execute the block that you have entered again, you use / command instead of typing everything from scratch:

plsql anonymous block - execute a block again

If you want to edit the code block, use the edit command. SQL*Plus will write the code block to a file and open it in a text editor as shown in the following picture:

plsql anonymous block - edit

You can change the contents of the file like the following:

begin
	dbms_output.put_line('Hello There');
end;
/Code language: PostgreSQL SQL dialect and PL/pgSQL (pgsql)

Save and close the file. The contents of the file will be written to the buffer and recompiled.

After that, you can execute the code block again, it will use the new code:

plsql anonymous block - execute

Execute a PL/SQL anonymous block using SQL Developer

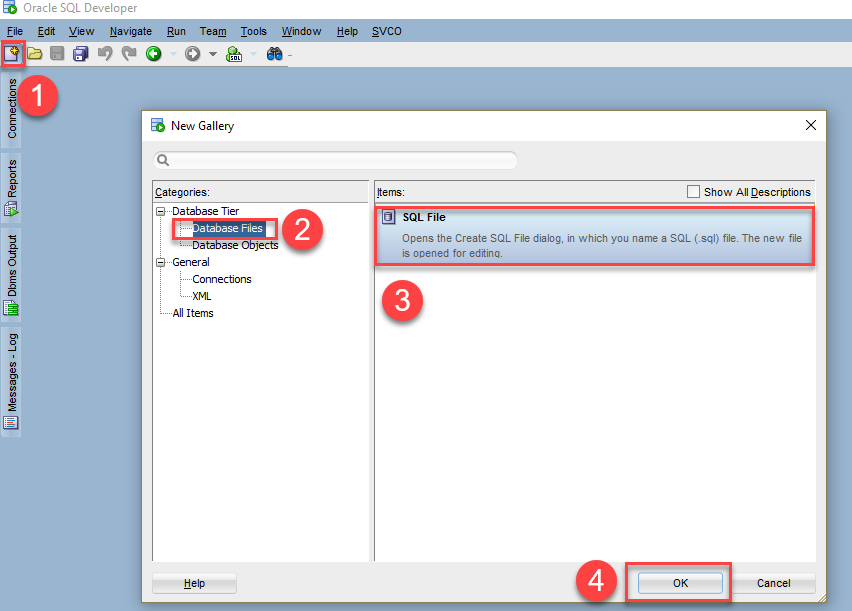
First, connect to the Oracle Database server using Oracle SQL Developer.

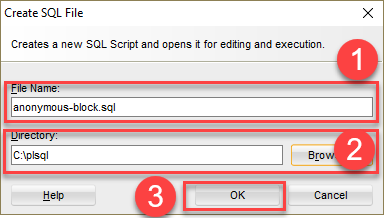
Second, create a new SQL file named anonymous-block.sql resided in the C:\plsql directory that will store the PL/SQL code.

PL/SQL anonymous block - sql developer
PL/SQL anonymous block - sql developer - create SQL file

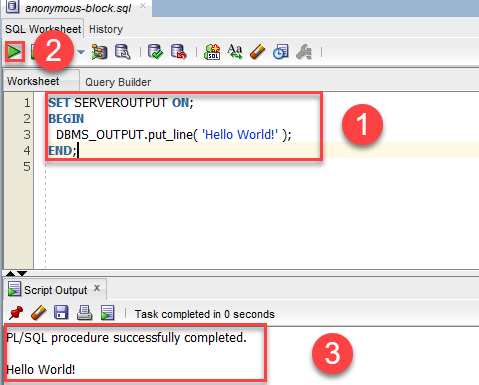
Third, enter the PL/SQL code and execute it by clicking the Execute button or pressing the Ctrl-Enter keyboard shortcut.

PL/SQL anonymous block - SQL developer - execute PL/SQL Block

More PL/SQL anonymous block examples

In this example, we first declare a variable l_message that holds the greeting message. And then, in the execution section, we use the DBMS_OUTPUT.PUTLINE procedure to show the content of this variable instead of using a literal string.

DECLARE
  l_message VARCHAR2( 255 ) := 'Hello World!';
BEGIN
  DBMS_OUTPUT.PUT_LINE( l_message );
END;Code language: PostgreSQL SQL dialect and PL/pgSQL (pgsql)

Here is the output:

Hello World!

The next anonymous block example adds an exception-handling section that catches ZERO_DIVIDE exception raised in the executable section and displays an error message.

DECLARE
      v_result NUMBER;
BEGIN
   v_result := 1 / 0;
   EXCEPTION
      WHEN ZERO_DIVIDE THEN
         DBMS_OUTPUT.PUT_LINE( SQLERRM );
END;Code language: PostgreSQL SQL dialect and PL/pgSQL (pgsql)

The error message is:

ORA-01476: divisor is equal to zero

ASM Disks performance metric

ASM Disks performance metric

SET ECHO off
SET FEEDBACK 8
SET HEADING ON
SET LINESIZE 230
SET PAGESIZE 300
SET TERMOUT ON
SET TIMING OFF
SET TRIMOUT ON
SET TRIMSPOOL ON
SET VERIFY OFF
CLEAR COLUMNS
CLEAR BREAKS
CLEAR COMPUTES
COLUMN disk_group_name FORMAT a20 HEAD ‘Disk Group Name’
COLUMN disk_path FORMAT a20 HEAD ‘Disk Path’
COLUMN reads FORMAT 999,999,999,999 HEAD ‘Reads’
COLUMN writes FORMAT 999,999,999,999 HEAD ‘Writes’
COLUMN read_errs FORMAT 999,999,999 HEAD ‘Read|Errors’
COLUMN write_errs FORMAT 999,999,999 HEAD ‘Write|Errors’
COLUMN read_time FORMAT 999,999,999,999 HEAD ‘Read|Time’
COLUMN write_time FORMAT 999,999,999,999 HEAD ‘Write|Time’
COLUMN bytes_read FORMAT 999,999,999,999,999 HEAD ‘Bytes|Read’
COLUMN bytes_written FORMAT 999,999,999,999,999 HEAD ‘Bytes|Written’
BREAK ON report ON disk_group_name SKIP 2
COMPUTE sum LABEL “” OF reads writes read_errs write_errs read_time write_time bytes_read bytes_written ON disk_group_name
COMPUTE sum LABEL “Grand Total: ” OF reads writes read_errs write_errs read_time write_time bytes_read bytes_written ON report
SELECT
a.name disk_group_name
, b.path disk_path
, b.reads reads
, b.writes writes
, b.read_errs read_errs
, b.write_errs write_errs
, b.read_time read_time
, b.write_time write_time
, b.bytes_read bytes_read
, b.bytes_written bytes_written
FROM v$asm_diskgroup a JOIN v$asm_disk b USING (group_number)
ORDER BY a.name ;

Fusion Middleware environment start and stop steps

Steps to start and stop Fusion Middleware environment

1. Steps, in order, to start Fusion Middleware environment
2. Steps, in order, to stop Fusion Middleware environment

Starting an Oracle Fusion Middleware Environment

1. Steps, in order, to start Fusion Middleware environment.

1. Start the database-based repository i.e. start the database.
set the correct ORACLE_HOME and ORACLE_SID
Start the Net Listener:
$ORACLE_HOME/bin/lsnrctl start
Start the database instance:

$ORACLE_HOME/bin/sqlplus
SQL> connect SYS as SYSDBA
SQL> startup

2. Start the Oracle WebLogic Server Administration Server.
You can start/stop WebLogic Server Administration Servers using the WLST command line or a script.
$DOMAIN_HOME/bin/startWebLogic.sh <

Note: While you start/stop also start/stop the processes running in the Administration Server including the WebLogic Server Administration Console and Fusion Middleware Control.

3. Ensure Node Manager is running. Below is the script to stat it.
$WLS_HOME/server/bin/startNodeManager.sh
OR
$DOMAIN_HOME/bin/startNodeManager.sh
Note: stopNodeManager.sh can be used to stop it.

4. Start Oracle Identity Management system components.
Set $ORACLE_HOME and $ORACLE_INSTANCE environment for Identity Management components.
Start/stop OPMN and all system components:
$ORACLE_INSTANCE/bin/opmnctl startall

Steps, in order, to stop Fusion Middleware environment

2. Steps, in order, to stop Fusion Middleware environment

1. Stop system components as Oracle HTTP Server etc.
Note: You can stop them in any order.
Set $ORACLE_HOME and $ORACLE_INSTANCE
$ORACLE_INSTANCE/bin/opmnctl stopall

To stop Oracle Management Agent, use the following command:

opmnctl stopproc ias-component=EMAGENT
2. Stop WebLogic Server Managed Servers. 
Note: Any applications deployed to the server are also stopped.
$DOMAIN_HOME/bin/startManagedWebLogic.sh
managed_server_name admin_url

3. Stop Oracle Identity Management components.
set $ORACLE_HOME environment variable to the Oracle home for the Identity Management components.
$ORACLE_INSTANCE/bin/opmnctl stopall

4.Stop the Administration Server.
You can start Server Administration Servers using the WLST command line or a script.

$DOMAIN_HOME/bin/bin/stopWebLogic.sh

Note: While you start/stop also start/stop the processes running in the Administration Server including the WebLogic Server Administration Console and Fusion Middleware Control.

5. Stop the database.
Set $ORACLE_HOME and $ORACLE_INSTANCE
connect SYS as SYSDBA
SQL> shutdown immediate ;